
Good morning Deb here today to show you how to make easy Thanksgiving Embellishments with Fall leaves.

We’re well into fall and the leaves in our area have reached their peak color. And every morning there’s a fresh layer of leaves all over my yard. With Thanksgiving a few weeks away, it’s time to start thinking about decorating. Today I’m going to show you how to make accents using leaves, the Best Glue Ever, and gold leaf. These accents can be used in all your fall crafting — Thanksgiving centerpieces, mantel decorations, napkin rings, placecards, wreaths, and even scrapbooking projects.
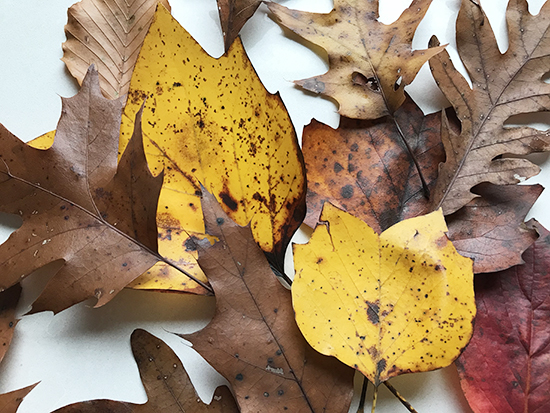
To start, gather up fresh leaves. You want a variety of sizes, shapes and color and ideally, leaves that are in good shape and not covered with a lot of dirt or starting to crumble. If your leaves are dirty, gently rinse them off and pat dry. If wet, pat them dry with a few paper towels. You want to take care not to rip or tear them. Don’t have leaves? This technique will work with paper or artificial ones as well.
To start, I like to work on a disposable surface when I’m working with adhesive, so I used the paper towels with which I dried my leaves. This makes clean up super easy — I just toss the paper towels! Next, I squeezed a good size dollop of the Best Glue Ever onto a small piece of wax paper (easy clean up guys!)

I used an old brush to apply the glue to each leaf in a random manner. I wanted each leaf to be different without covering the entire leaf. I was after a more organic look, but I’m thinking this would also be fun to do using stencils or stamps.
Tip: thin layers of glue work best. You don’t want clumps of glue as it won’t leaf as well.

Once I had finished applying glue to every leaf I grabbed my containers of leafing — or gilding as it’s also called. I like these containers with pieces of leaf rather than the full sheets. You can get leafing in various colors – gold, silver, rose, mixed, etc. Today I’m using copper and silver leaf.
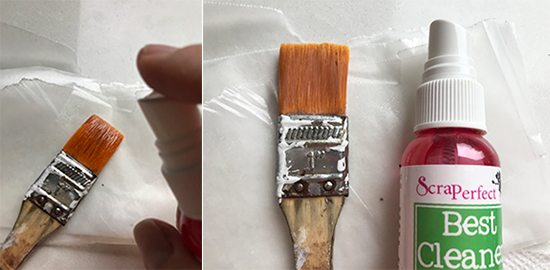
But wait! Before you do anything else, take a few minutes to clean your brush! The Best Glue Ever dries tacky (which is what you need to leaf) and won’t dry out. So you can take your time and get the glue out of your brush before it dries.
How? A few spritzes of the Best Cleaner Ever worked into the bristles. Rub it in just like you would soap and work it through the bristles, then rinse in water. Follow with rubbing a bit of soap through the bristles to remove any remaining cleaner and rinse. Good as new!
Back to the leaves…..
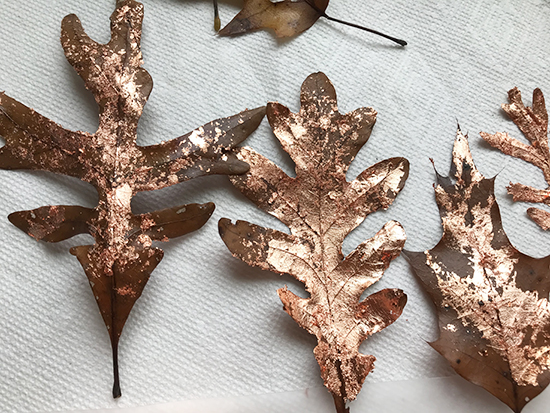
Take a pinch of the leafing and drop it on a leaf. Use a stiff bristled brush to move and burnish the leafing. Keep adding leafing until the leaf is coated to your satisfaction. I used a piece of wax paper as my work surface, again, which helps with clean up.

I’ve found that leafing likes to clump together and requires a bit of pressure when burnishing. The goal is to have a thin layer of leafing so that the veins and surface texture are visible and highlighted by the leafing. You want to be firm enough to removed the excess leafing (especially on the edges), but not rip your leaf.

You’ll notice that as you burnish small pieces of leaf will collect on your surface. Don’t throw them out! You can use all this leafing — either shake it back into the container or do what I did and use one of your leafs to pick it up. Here’s what you get:

When you’re finished with the leafing, use the Perfect Crafting Pouch to lightly pounce on any areas that are still tacky.
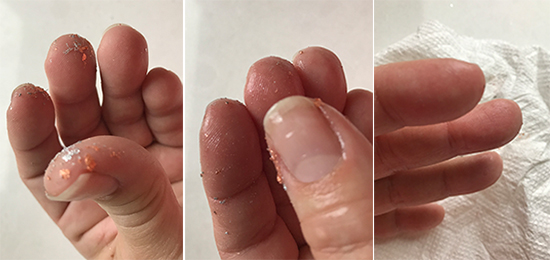
And if you end up leafing your fingers like I did, one spray of the Best Cleaner Ever will remove it all. Just rubbing my fingers together quickly removed the adhesive and leafing.
Now, sit back and admire your work….


Stop back by the blog to see what becomes of all these leaves!

