Every year we send out family photo cards for the holidays and we still do. But this year, I created this Snowflake card in blue for a special high school friend who I just reconnected with after 30 years…the power of FaceBook! LOL!! I love how it turned out so I wanted to share with you!
I embossed a piece of 4 1/8 x 5 3/8” white shimmery cardstock with the Swiss Dot embossing folder. In its center, I cut/embossed one large 2011 Snowflake Pendants and the medium center piece nested inside to create an opening. Set aside.
Using the same die template set, I cut/embossed another set with another white shimmery cardstock. Placed the embossed card front onto the A2 card base with The Best Glue Ever. Shifted the snowflake die cuts in the desired look and adhered. The center piece, I used foam tape. With the Embellie Gellie, I was able to place the bling perfectly in the center!
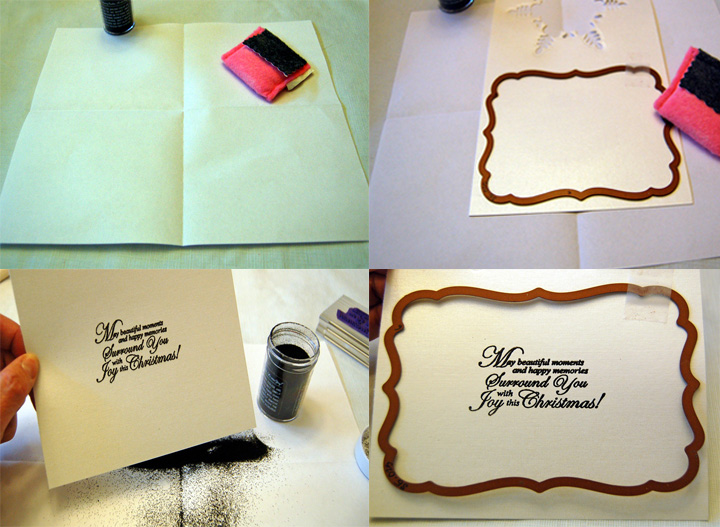
For the inside of the card, I needed an embossed sentiment. So I prepped the piece of paper where I will dump the embossing powder on by wiping with the Perfect Crafting Pouch. This will help the powder slide easily back into its container.
Next I used the Perfect Crafting Pouch on the area where I will be stamping. I used my die template as a guide. It is very important to use the pouch because as you can see, the font is very fine – no room for mistakes! After it was heated and cooled, place the die template over the sentiment and tape with repositionable tape to secure. Cut/emboss and place in the inside of the card. You’re done!
Thank you for stopping by!
Happy Holidays and may beautiful moments surround you and your family with joy!!
MargieH
Supplies: Cardstock: WorldWin Papers; Stamp: JustRite Stampers; Embossing
Powder: American Crafts; Ink: VersaMark; Bling: Prima; Dies:
Spellbinders Paper Arts (S5-054 2011 Snowflake Pendants, S5-025 Labels
Seventeen); Embossing Folder: Sizzix; Tools and Adhesive: ScraPerfect
(The Perfect Crafting Pouch, The Best Glue Ever, The Embellie Gellie);
Other: Foam Tape


